August is here, and the entire world seems to be going back to school, or buying back-to-school stuff, or advertising back-to-school stuff. I spent a lot of time in classrooms--1961 to 2013--and I'm like an old war horse: I hear the siren call of fresh books, new crayons, and pristine notebooks, and I start thinking about school. If I was still in the classroom, I'd be finishing up my own back-to-school shopping, and getting ready for professional development and staff meetings before the controlled insanity that is the traditional school year starts on August 19.
One of the really nice things about having control of my how I spend my time is that I can finally focus on my own educational goals. I started thinking about who I am, and what I want "to be when I grow up," and I've discovered that some goals have changed in the last twenty-five years.
I no longer feel the need to go out and get yet another piece of paper from yet another institution of higher learning--I've got a Master of Arts and that's enough. I don't even have my degrees hanging in the studio--I think they're in a box in the attic--because a B.A. in History and a M.A. in Educational Technology simply don't mean that much to me as an artist. I don't feel the need to finish up the units (about 30, or a year of study) to receive a B.A. in Art History or B.F.A. in Printmaking. After this many years, I don't need the discipline of class schedules and deadlines to pursue topics I'm interested in, and there are very few programs that will accept all that I've already done (both as a student and as a professional) and simply let me continue to grow as an artist.
I toyed with the idea of signing up for one of the weaving classes offered by the City College of San Francisco (CCSF). For those unfamiliar with CCSF, it's the largest community college in California, and one of the very few public institutions that still have Textiles programs. The weaving classes were taught for many years by Peggy Osterkamp, and when I started weaving again, one of my dreams was to study weaving with her. Unfortunately, the classes were always during the day, and during the school year, so I was not able to fulfill that dream before she retired. Janice Sullivan has taken over as the instructor, and she's good, but she's not Peggy. There is also the little matter of cost. CCSF isn't horridly expensive (about $50/unit), but the weekly commute from Vallejo to downtown San Francisco is. I ran the numbers, and it would cost me about $100 to sign up for the two-unit "Weaving I" class, and about $400 to travel back and forth. Personally, I think I'd rather spend the money on more books and/or more stash.
That leaves "distance learning," either through a formal course of study or on my own. Olds College in Canada offers marvelous certificate programs in weaving and spinning, but they are, to me, horridly expensive: $8,000 (about the cost of the entire program including the residency each year) is a lot of money to someone whose undergraduate college education cost less than that. There's also the issue of traveling to Olds College every June for Fibreweek to complete the residency portion of the coursework--it falls right at a time when I have a number of other commitments.
So that leaves study on my own. I'm familiar with a lot of the guild-offered certificate programs (Handweavers Guild of America's Certificate of Excellence; Weavers Guild of Boston and Ontario Handweavers Guild's Master Weaver certificates), and, thanks to the miracle of modern computing, have downloaded all the information each has on their programs. I've also ordered the handbooks for the Certificates in Excellence for handspinning and handweaving from HGA.
Looking at these, I can see how much I know, and where there are gaps: for example, I know how to dress a loom; throw a shuttle; weave a nice piece of cloth; and explain the intricacies of color theory; but I don't understand the "why" behind overshot design, or have some practical experience with rep weaving. These are things I've wanted to learn, or to try, for years, but I haven't had the time to really focus on them. Now I have the time, and I have the equipment, so it's time to head back to "school."
Sunday, August 09, 2015


Tuesday, August 04, 2015
Torn Tendons & "Drunk" Knitting
 |
| Life--it happens. |
The current interruption is a large (to my eyes), bright red, fiberglass cast, currently encasing my right leg from just below my knee to my toes. It turns out, I've got a tear in my achilles tendon, and the first line of treatment is to completely immobilize my lower leg for four weeks, to give the tendon a chance to heal. This, definitely, was not in my plan for the month of August.
Along with the bright red cast came a long list of instructions: Don't drive (well, duh!). Don't walk more than necessary. Don't sit for long periods with the cast on the floor. Don't get the cast wet. Pretty much, I get to spend the next four weeks sitting on the divan, with my right ankle (and cast) propped up on a pillow on the ottoman.
I am managing to get a few things done in the studio. I finished winding a 10-yard warp for the Gem. There's a 35-yard towel warp on Mongo, waiting for me to sit down and throw a shuttle. However, I quickly discovered that weaving with a cast on one foot is nearly impossible: I can't flex my ankle to reach for the treadles, and the weight of the cast throws me off-balance. Weaving is definitely O.U.T. until I'm free.
Since I can't weave, maybe I can spin. Spinning on any of my wheels is out: they all require at least a right foot for treadling and, quite frankly, if I could treadle a spinning wheel, I could probably weave. However, all is not lost: I own a Hansen miniSpinner, and that only requires that I plug it in to a battery. I've got some nice black Cormo all carded and waiting for me to spin it, so this is probably the time to do it. I also got several pounds of Corrie pin-draft back from the processor two weeks ago, so I really am not lacking for fiber to spin.
Since a girl cannot live on spinning alone, there's plenty of knitting to be done. That brings me to the second part of the title: drunk knitting. I'm no prude, but I learned a long time ago that one does not attempt complex patterns such as lace knitting when having a glass of wine or a cocktail, or one later asks, "Who was working on my knitting, and what the hell did they do to it?" I've learned that simple, stockinette-based patterns are best when doing "social" or "travel" knitting because they don't require any real thought--the fingers know what to do, and they do it.
My favorite "drunk knitting" is socks. I know--most people think socks are hard, but they really aren't, especially when you've knit as many socks as I have in the past ten years. My basic sock pattern is so simple and familiar that I don't even have it written down. Basically, it's cast on a "star" toe with increases to 60 stitches, knit 60 rounds, do the heel, then knit the leg until I run out of yarn. I knit them one-at-a-time, on two #2 circular needles. No kitchener stitches to close the heel, no worrying about whether or not I'll run out of yarn before I run out of foot. They're pretty much fool-proof: once the toe is done, I only need to pay attention when I'm actually turning the heel.

Sunday, July 26, 2015
A Ton of Tomatoes
 It's high summer and, quite frankly, the cooking is pretty easy if most of the ingredients come out of the garden. Of course, this means that time was spent in April to create the garden, especially here in the Bay Area.
I am the first to admit that I am not a very good gardener. I tend to swing between two extremes--too much care, usually at the beginning of the growing season, or complete neglect because my summer schedule has gotten so tight I don't have time to work in the garden. Add to that poor clay soil, and sometimes strange weather, and gardening--to a kid who grew up in the land of sandy loam and eternal spring--becomes a mystifying chore. As a result, my "farm" is tiny: a bunch of pots for the herbs, larger pots for a couple of tomato plants, and two tiny (2x3 foot) raised beds.
This year, we tried something new: timed drip irrigation. Due to the ongoing drought, we're on very tight watering restrictions, but those don't apply to drip irrigation. "Drip" also means that water is going to the plants in the pots, and not on the bare dirt pathways, so there is less weeding. We spent a couple weeks laying out drip irrigation and planting this year's vegetables, herbs, and flowers in two areas--the kitchen garden and the flower bed at the top of the steps, then stepped back and waited to see what would happen.
Included in all that gardening was planting two tomato plants. I hadn't intended on planting tomatoes. Tomatoes are actually rather easy to grow as plants, but getting a supply of fresh tomatoes can be tricky, and last year's crop (from a couple of heirloom varieties) was not very good: they didn't get watered in late June (we were both gone), and the varieties I planted were particularly subject to blossom end rot. Also, we are in a marginal area for producing tomatoes: most varieties need nights above 55 degrees to set fruit, then a long enough period of warm, sunny days for the fruit to ripen. But I got a request from the Spousal Unit, so that "good intention" went out the window.
This year, I tried something different. First, I planted a variety that I knew was disease-resistant and ripened quickly: Early Girl, which ripens in 50 days. The second thing I did was to pinch off the early blossoms. We frequently get a day or two of hot weather (and correspondingly warm nights) in May, but this year I wanted the plants to get big and healthy before starting to set fruit. The third thing was putting the tomato pots on the same irrigation schedule as the rest of the vegetable garden, so they are getting a regular supply of water, whether or not I'm around to administer it.
I have tomatoes. A veritable ton of tomatoes. I stopped picking the blossoms off the tomato plants around June 1, so the calculated harvest date would be this week. I picked a bunch of ripe tomatoes yesterday, along with the last of the basil, and turned some of them into one of our favorite summer salads. This morning will be a tomato and cheese fritatta for brunch, and the coming days will be filled with turning all this bounty into meals.
Marinated Tomato and Brie Salad
4 or more medium-sized ripe tomatoes, seeded and diced
8 oz. nearly-ripe brie, rind removed, cut into small pieces
1/2 cup fresh basil, chopped very fine
3 cloves garlic, minced
1/3 cup good extra-virgin olive oil
Salt and pepper
Combine the tomatoes, brie, basil, and garlic in a large bowl. Add olive oil and gently turn the salad to coat everything. Add salt and pepper to taste. Let stand about 45 minutes at room temperature, or several hours in the refrigerator for the flavors to meld (if storing in the refrigerator, take out, stir, and let come to room temperature before serving). Serve with a good, crusty bread and a nice bottle of wine.
Sunday, July 19, 2015
Back to the Salt Mines
 |
| Mongo with the old 1-yard sectional warp beam. |
When I bought Mongo, my big 16-shaft Macomber, it came with two plain warp beams. Now, having two warp beams is nice, but having a sectional warp beam is even better, especially for the long warps I normally weave. I bought a used (well-used, it turned out) 1-yard sectional warp beam, just after we brought Mongo home, installed the sectional warp beam (removing both plain warp beams in the process), and got to work. It was a pretty good warp beam, considering that it was probably older than I am, and I run quite a bit of warp through it during the nearly two years it was on the loom.
Unfortunately, in early April, like the wonderful one-hoss shay, it finally fell into pieces...about four yards before the end of a warp. My only indications that it was failing were the metallic sounds of the steel section pins hitting the floor. As it occasionally shed pins in the past, I didn't worry until I found that every time I pulled the beater toward me, the entire beam would lurch and advance. Not good. I ended up jury-rigging a couple of weights to counteract the pull of tensioning, and wove off the warp, getting up to removing the weights, advancing the warp, then weighting the beam again. It was a struggle, but I finished the warp, cut off the cloth, then surveyed the damage. Most of the steel section pins were on the floor behind the loom, and the wood friction brake drum was as smooth as a piece of glass. My big sectional warp beam was done.
One of the great advantages of owning a loom that is still in production: I called Macomber to order a brand-new warp beam. Large pieces for a loom tend to be semi-custom orders, I could pick and choose exactly what I wanted--the smaller, 3/4-yard sectional, with a steel friction brake. Ed (the owner of Macomber Looms) said it wasn't any problem, but he was waiting on his foundry to produce "spiders"--the steel spindle at the opposite end of the beam. He thought he'd have them in by the end of the following week, and he would call me.
 |
| Mongo, with the new sectional warp beam and one of theold plain beams. |
About 10 days after Ed got the spiders, the UPS man dragged a very large crate onto my front porch: I had my new warp beam. We carefully unpacked it, carried it upstairs, and I reconfigured the back of Mongo into exactly the configuration I've always wanted: sectional warp beam (the beam I use the most) on top, controlled by the friction brake, with the plain, ratchet-brake beam on the bottom for when I weave with supplemental warps. I also adjusted the brake so a slight tap releases the friction brake, but pushing it all the way down releases both beams to advance both warps together. All in all, it's a pretty slick set-up.
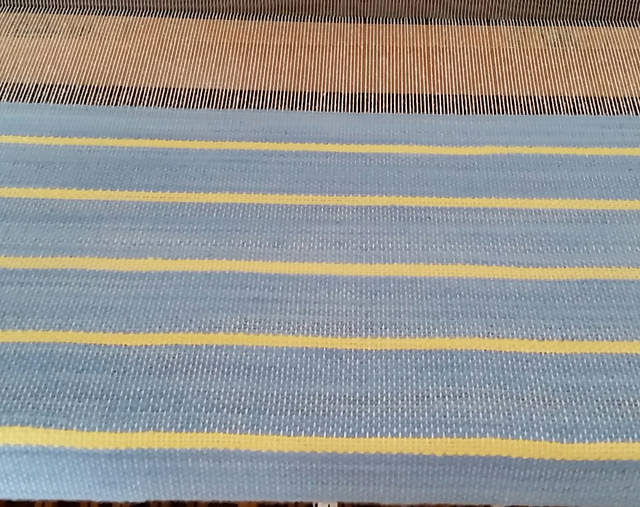
With all the preparations and travel in June, I didn't have the opportunity to dress Mongo until the beginning of July, but when I did, I put on 18 yards of natural 8/2 cotton to weave the linsey-woolsey I've been promising myself for the past year. I spun the weft from a Nebo-Rock merino hogget in 2013, and dyed half of the yarn with indigo and the other half with marigolds last summer, specifically for this cloth. The striped indigo was the first piece, and I ended up with nearly 8 yards on the loom. Right now, I'm weaving off the plain yellow cloth. Once wet-finished, the striped will be turned into a late 18th-century short gown, with a petticoat/skirt from the yellow.
 |
| My marigold-striped indigo linsey-woolsey. |
Sunday, June 14, 2015
Packing for Time Travel
Every time I pack for a trip, I feel like I'm coordinating the invasion of a small country--there is so much stuff I have to drag along with me! A lot of my trips involve camping, so there's all the camping gear--tentage, bedding, cookware, an ice chest or two, food--along with some clothes, and the all-important "stuff" to keep me happy and entertained while I'm in the Great Outdoors. This means at least one spinning wheel, bobbins, a kate, a niddy-noddy, and fiber, along with some needlework project (usually knitting) to work on in the evenings or when I don't feel like spinning. The stuff for a camping trip fills the entire back of my CRV; an extended trip means I have to take some things out (or put them up on the roof in the carrier) just to have room for an additional passenger.
A "period" camping trip is a bit more problematic: all my gear, clothing, and food have to be as close to the time period as possible. I refuse to be "That Person" (the one who knows better, but doesn't bother), so "time travel" can take days or weeks of preparation.
I'm in the throes of packing for the 2015 Pacific Primitive Rendezvous, and it's a logistical challenge. First, there's the camping gear: when I go to a modern camping event (such as the Black Sheep Gathering), my tent, canopy, sleeping bag, air mattress, pillows, and blanket take up a space about 3x3x3'. When we (I normally travel with the Spousal Unit) go to a rendezvous, our 12x20-foot canvas bell tent takes up that much space, with additional space needed for the fly, the tent poles, the ropes, and the tent stakes. The Spousal Unit refuses to sleep on the ground, so we have a full-sized "portable" slat bed, complete with headboard and footboard, and a futon that fits in it, sheets, pillowcases, and blankets. We will fill the entire bed of the Tacoma, with the important/delicate items (his cameras, my spinning wheel) in the cab, behind our seats. It will be a tight fit for everything, but we always seem to make it happen.
Things that aren't "period," but are necessary for safe, comfortable camping (e.g., the ice chest) need to be disguised. I'm making a canvas cover for our ice chest, so it looks like an innocuous canvas trunk; fire irons, the harrow disk-cum-brazier, griddle, and dutch ovens are all in canvas bags; and the other "essentials" (the solar charger for the phones; beer) can be out of sight in the tent, or left in the truck if it isn't too far a walk.
Events like this are the reason I bought a Rick Reeves-built spinning wheel as soon as I got my first teaching contract: my little castle wheel is a close copy of an 18th century spinning wheel, and doesn't offend. I also bought a lot of bobbins when I bought the wheel, so I can take a bunch of the oh-so-fragile bobbins with me and look the very picture of an early 19th century spinster. However, one simply can't sit down and spin--in addition to the wheel, I take along a stool, and a split-ash pack basket full of tools: handcards; a kate; a couple balls of twine for tying up skeins and replacing the drive band; a bottle of oil to keep the wheel running smoothly; and a niddy-noddy for winding the finished bobbins into skeins. I also pack along a Woolee Winder and bobbins for it--while not "period," it's still the best tool around for plying.
If I'm going to the trouble of packing my wheel, I need fiber to spin. This year, it's the lightest portion of a gray Rambouillet I picked up about 18 months ago and scoured, and some beautiful black Romney. They're packed into cloth bags, both for protection and for easy transport.
The Spousal Unit also suggested that I take one of my spindles along. Since my favorite Turkish spindle isn't something that would have been seen in the early 19th century (and is currently full of some brilliant hand-painted singles), my tiny low-whorl spindle, along with some undyed top, is packed in a small box. I will come home with skeins, ready for wet-finishing.
Why go to all this trouble? Because, while the "getting ready" and "getting to" parts are not that great, the actual events are fun. I get to spend a week (or sometimes more) surrounded by beautiful scenery, pretending I'm living during another time. I usually meet a lot of really nice people, enjoy the scenery, relax, and generally have a great time.
A "period" camping trip is a bit more problematic: all my gear, clothing, and food have to be as close to the time period as possible. I refuse to be "That Person" (the one who knows better, but doesn't bother), so "time travel" can take days or weeks of preparation.
 |
| This year's rendezvous site, on the Chewaucan River in Oregon. |
Things that aren't "period," but are necessary for safe, comfortable camping (e.g., the ice chest) need to be disguised. I'm making a canvas cover for our ice chest, so it looks like an innocuous canvas trunk; fire irons, the harrow disk-cum-brazier, griddle, and dutch ovens are all in canvas bags; and the other "essentials" (the solar charger for the phones; beer) can be out of sight in the tent, or left in the truck if it isn't too far a walk.
 |
| The camp, by moonlight. |
If I'm going to the trouble of packing my wheel, I need fiber to spin. This year, it's the lightest portion of a gray Rambouillet I picked up about 18 months ago and scoured, and some beautiful black Romney. They're packed into cloth bags, both for protection and for easy transport.
The Spousal Unit also suggested that I take one of my spindles along. Since my favorite Turkish spindle isn't something that would have been seen in the early 19th century (and is currently full of some brilliant hand-painted singles), my tiny low-whorl spindle, along with some undyed top, is packed in a small box. I will come home with skeins, ready for wet-finishing.
Why go to all this trouble? Because, while the "getting ready" and "getting to" parts are not that great, the actual events are fun. I get to spend a week (or sometimes more) surrounded by beautiful scenery, pretending I'm living during another time. I usually meet a lot of really nice people, enjoy the scenery, relax, and generally have a great time.
 |
| This is worth the hassle of packing. |
Sunday, June 07, 2015
I Am A Snob
There...I've stated it out loud, for everyone to see. I am A Snob. No, not that definition of "snob"
"...a person with an exaggerated respect for high social position or wealth who seeks to associate with social superiors and dislikes people or activities regarded as lower-class..."
but this definition of "snob"
"...a person who believes that their tastes in a particular area are superior to those of other people..."
Many years ago, when I was a newly-minted teenager, I had, for eighth-grade English, a newly-minted English teacher. She was probably about 23, fresh out of college, and full of lovely ideas on how she was going to bring Literature to all these poor junior high school kids who had probably never cracked a book. Eighth grade English is where students learn about journals and diaries as literature: a common book to assign is The Diary of Anne Frank, and a common assignment is for students to keep their own journals for a period of days or weeks. However, this new teacher wanted nothing so pedestrian as a diary by a 14-year-old girl hiding from the Nazis for her students. No! They should be exposed to the great minds of...the 17th century. She subjected us to the diaries of Samuel Pepys, an English bureaucrat who kept a detailed diary from January 1, 1660 to May 31, 1669. While some of the entries is Pepys' diaries are fascinating (the coronation of Charles II; the Great Fire), a fair amount is not really suitable for an 8th-grade classroom (Pepys was a philanderer and chronicled his sexual exploits) and the rest can be mind-numbingly dull. However, she was out to prove something, and our assignment for several weeks was to keep a journal of our own lives, the way Pepys did. Since this was the late 1960s, we were encouraged to write how we really felt, and the teacher would collect our journals periodically to give us a grade (remember, this was a homework assignment). Being the good little student I was, I did as I was told, and wrote in my journal nearly every day. Also, being the independent thinker I am, I wrote down my feelings, on journal-keeping in general, and on what I thought of Mr. Pepys and his very dull diary.
On the appointed day, I turned in my journal, and received the two worst things that could happen to a young scholar: a "D" on my journal, and a telephone call to my mother. Of the two, the "D" was the lesser of the punishments--I had gotten bad grades on assignments before, so I was disappointed but not overly concerned. However, a telephone call home? That was worse than being sent up to "talk to the principal." Whatever had I done to merit that?
I dragged myself home that afternoon, expecting to be grounded until I graduated high school. Nothing. When I mentioned to my mother that my teacher had told me that she had called, my mom said, "Oh, yes. I talked to her and set her straight." That was it. Weird, but I was willing to let it go. Later on, I got the full story of that call. My teacher was upset by I had written in my journal (I believe I had written that I thought Pepys was boring, and that it was stupid that we had to learn about him instead of Anne Frank), so she called my mother and informed her that I was "an intellectual snob." My mother--bless her--told the teacher that I was brought up to be proud of my intellectual abilities and accomplishments, and, by the way, what was that teacher thinking, in assigning the writings of a 17th century bureaucrat to a bunch of 13-year-olds, then penalizing them for expressing their opinions in their journals?
I relate this tale because I had a similar experience this week. No, I'm not reading Pepys for an assignment: this time, it was in connection with weaving and the teaching of weaving. I am what some people consider a Traditionalist fiber and textile artist--I got interested in the historical aspects of cloth more than twenty years ago, and continue to be fascinated by it. I am also a traditionally trained educator: I went to graduate school, got California-issued teaching credentials, and spent a lot of years in the K-12 education system. I can write a lesson plan in my sleep, and I know how to deliver content effectively. In a discussion on weaving instruction, I mentioned that there are a couple things I am clear about in my classes, specifically that I don't care for a popular form of weaving known as "Saori," and that I don't rent studio time nor equipment for people to play around. If someone is interested in the former, I can recommend several good teachers; if it's the latter, I used to know of a studio where loom rentals and studio space rentals were possible.
It seems having an opinion is enough to get people riled up, to the point that I (and some others) were referred to as "elitist snobs." I am a snob because I don't care for the loosey-goosey, do-your-own-thing nature of Saori weaving. I am a snob because I want to be respectful of students' and my time, so I am careful to detail what we will learn before we learn it, then check for knowledge throughout the lesson(s). I am a snob because I expect students to be respectful of each other's time and to be there because they want to learn what I've described. I am a snob because I will expect my students to gain some knowledge. As I stated at the beginning, I am A Snob.
I'm OK with that. I have more than a decade of high school students calling me shockingly vile names (and getting kicked out of class for doing it), so "snob," is pretty mild. I don't even look at is as something bad: I've worn the "snob" label most of my life, and am, frankly, a little proud of it. I'm still proud of my intellectual abilities and accomplishments, and I'm proud of my skills as a weaver, spinner, dyer, and all-around fiber and textile artist. I have the luxury of not needing to teach to make my bread, so I can smile and send those who attempt to insult me on their way.
"...a person with an exaggerated respect for high social position or wealth who seeks to associate with social superiors and dislikes people or activities regarded as lower-class..."
but this definition of "snob"
"...a person who believes that their tastes in a particular area are superior to those of other people..."
Many years ago, when I was a newly-minted teenager, I had, for eighth-grade English, a newly-minted English teacher. She was probably about 23, fresh out of college, and full of lovely ideas on how she was going to bring Literature to all these poor junior high school kids who had probably never cracked a book. Eighth grade English is where students learn about journals and diaries as literature: a common book to assign is The Diary of Anne Frank, and a common assignment is for students to keep their own journals for a period of days or weeks. However, this new teacher wanted nothing so pedestrian as a diary by a 14-year-old girl hiding from the Nazis for her students. No! They should be exposed to the great minds of...the 17th century. She subjected us to the diaries of Samuel Pepys, an English bureaucrat who kept a detailed diary from January 1, 1660 to May 31, 1669. While some of the entries is Pepys' diaries are fascinating (the coronation of Charles II; the Great Fire), a fair amount is not really suitable for an 8th-grade classroom (Pepys was a philanderer and chronicled his sexual exploits) and the rest can be mind-numbingly dull. However, she was out to prove something, and our assignment for several weeks was to keep a journal of our own lives, the way Pepys did. Since this was the late 1960s, we were encouraged to write how we really felt, and the teacher would collect our journals periodically to give us a grade (remember, this was a homework assignment). Being the good little student I was, I did as I was told, and wrote in my journal nearly every day. Also, being the independent thinker I am, I wrote down my feelings, on journal-keeping in general, and on what I thought of Mr. Pepys and his very dull diary.
On the appointed day, I turned in my journal, and received the two worst things that could happen to a young scholar: a "D" on my journal, and a telephone call to my mother. Of the two, the "D" was the lesser of the punishments--I had gotten bad grades on assignments before, so I was disappointed but not overly concerned. However, a telephone call home? That was worse than being sent up to "talk to the principal." Whatever had I done to merit that?
I dragged myself home that afternoon, expecting to be grounded until I graduated high school. Nothing. When I mentioned to my mother that my teacher had told me that she had called, my mom said, "Oh, yes. I talked to her and set her straight." That was it. Weird, but I was willing to let it go. Later on, I got the full story of that call. My teacher was upset by I had written in my journal (I believe I had written that I thought Pepys was boring, and that it was stupid that we had to learn about him instead of Anne Frank), so she called my mother and informed her that I was "an intellectual snob." My mother--bless her--told the teacher that I was brought up to be proud of my intellectual abilities and accomplishments, and, by the way, what was that teacher thinking, in assigning the writings of a 17th century bureaucrat to a bunch of 13-year-olds, then penalizing them for expressing their opinions in their journals?
I relate this tale because I had a similar experience this week. No, I'm not reading Pepys for an assignment: this time, it was in connection with weaving and the teaching of weaving. I am what some people consider a Traditionalist fiber and textile artist--I got interested in the historical aspects of cloth more than twenty years ago, and continue to be fascinated by it. I am also a traditionally trained educator: I went to graduate school, got California-issued teaching credentials, and spent a lot of years in the K-12 education system. I can write a lesson plan in my sleep, and I know how to deliver content effectively. In a discussion on weaving instruction, I mentioned that there are a couple things I am clear about in my classes, specifically that I don't care for a popular form of weaving known as "Saori," and that I don't rent studio time nor equipment for people to play around. If someone is interested in the former, I can recommend several good teachers; if it's the latter, I used to know of a studio where loom rentals and studio space rentals were possible.
It seems having an opinion is enough to get people riled up, to the point that I (and some others) were referred to as "elitist snobs." I am a snob because I don't care for the loosey-goosey, do-your-own-thing nature of Saori weaving. I am a snob because I want to be respectful of students' and my time, so I am careful to detail what we will learn before we learn it, then check for knowledge throughout the lesson(s). I am a snob because I expect students to be respectful of each other's time and to be there because they want to learn what I've described. I am a snob because I will expect my students to gain some knowledge. As I stated at the beginning, I am A Snob.
I'm OK with that. I have more than a decade of high school students calling me shockingly vile names (and getting kicked out of class for doing it), so "snob," is pretty mild. I don't even look at is as something bad: I've worn the "snob" label most of my life, and am, frankly, a little proud of it. I'm still proud of my intellectual abilities and accomplishments, and I'm proud of my skills as a weaver, spinner, dyer, and all-around fiber and textile artist. I have the luxury of not needing to teach to make my bread, so I can smile and send those who attempt to insult me on their way.
Sunday, May 31, 2015
Now, Back To Our Program...
Oops--I did it again. Life got busy, and writing got shoved to the back burner. Then, guilt for not writing set in--along with continuing to be really busy--and more time past. At least it hasn't been years since I last wrote anything.
What has gone on? Let's see...I broke my loom, and it took 7 weeks to get the parts to fix it. In the meantime, I did a lot of sewing, went to a bunch of arts-related stuff, taught (and played) at Maker Faire, and planted a very nice garden (which needs weeding). I'll write about them in a bit. Until then, here's a picture of me in a new steampunk ensemble at Maker Faire a couple weeks ago.

What has gone on? Let's see...I broke my loom, and it took 7 weeks to get the parts to fix it. In the meantime, I did a lot of sewing, went to a bunch of arts-related stuff, taught (and played) at Maker Faire, and planted a very nice garden (which needs weeding). I'll write about them in a bit. Until then, here's a picture of me in a new steampunk ensemble at Maker Faire a couple weeks ago.

Thursday, April 09, 2015
Every Five Years...
...I have to do something about the yard. It's hard to believe, but it's been five years since I really paid any attention to the appearance of our landscaping, and it's been through a lot, including major construction and a drought. I did a bit of work in my herb garden, but the front yard is embarrassing right now. The last major relandscaping was...8 years ago. There's a blog post about it, and how much I hate landscaping, but I'm doing things differently this time around:
- I'm starting now. Part of the reason I hate landscaping is that it always seemed to happen in the middle of summer, when it's in the mid-90s. Some of that had to do with my work schedule. Now that my time is, more or less, my own, I can work on the landscaping in Spring, when the weather is cooler.
- I'm keeping better records. Rather than start with buying a bunch of plants and then documenting what I've done, I'm working through the process in reverse: I started a garden journal, and drew good layouts of what I wanted to plant where. Everything is organized in a clearly-marked binder.
- I'm tackling the yard in sections. Our lot is deceptive. According to the deed, it is 65 by 65 feet. However, when our neighborhood was laid out in the 1870s, the City of Vallejo claimed 80 feet for every street "just in case" they wanted to make that street a main thoroughfare. As a result, we also have a 15-foot "frontage easement" that belongs to the City, but is our responsibility to landscape and maintain. Since we're on a corner, it means our lot is actually 80 x 80 feet, with the house at the very edges of our deeded property, and a big, shallow front yard that doesn't belong to us, but we're responsible for maintaining. It's too much to landscape all at once (especially by myself), so I've divided it up into sections, and I'm working my way around the house.
- I'm installing drip irrigation as I go along. It's essential now: we're entering the fourth year of less-than-average rainfall, and while there aren't restrictions on handwatering (just on sprinkler systems), moving everything over to drip irrigation on timers will save water, time, and my energy.
The herb garden was the first to get this new, improved, treatment, as it's the easiest garden to work: simply move a few pots, replace the herbs in need of replacement, and run the drip irrigation. I also pulled out the three non-climbing "climbing" roses and replaced them with bougainvillea--they're drought-tolerant, love full sun, grow fast, and have wicked-nasty thorns (good for a boundary fence). I have a tidy little collection of herbs-- marjoram, thyme, sage, basil, oregano, peppermint, Italian parsley, cilantro, spearmint, garlic chives, French tarragon, and lemon balm--and a dwarf lime.
Next was the small bed next to the herb garden. I planted a couple wax-leaf privets and a dietes bicolor two years ago and they're well established, but there were some holes. Those holes are now filled with a pink-striped New Zealand flax and several "Powis Castle" artemesia. They're small right now, but they'll grow.
There's a big bed (7'x22') at the top of the steps. It's an important spot, as it's the first flower bed you see when you climb the steps to the front walk. Originally, this was my rose garden and iris beds, but I lost nearly everything when the foundation was replaced in 2011. There are a few irises hanging on, and a single "Ragged Robin" (Rosa 'gloire des rosomanes') I want to save. That's the bed I'm focusing on now. The plan is drawn up, so next will be some plant removal and soil amending before installing new plants (all drought-tolerant flowering perennials).
Sunday, April 05, 2015
Tradition!
I grew up in Southern California, which means that Easter is normally warm, sunny, and a great day for a picnic or a barbecue. As a result, Easter sorta-kinda marks the start of the summer "let's eat outdoors" season. A lot of picnic foods are traditional: ham, deviled eggs, and especially potato salad.
My mother makes truly amazing potato salad. She learned to make potato salad right after she and my dad were married, and her recipe came from one of her neighbors, a little old German lady. It's sinful: lots of cholesterol, salt, carbohydrates, not even close to kosher, and guaranteed to pique the most jaded appetite. She taught me how to make it, and I make it for Easter, even though there are only two of us--that just means there's more for us!
Audrey's Amazing Smashed Potato Salad
Fry the bacon until crisp. Set fried bacon bits aside on paper towels to drain, and reserve at least 2 tablespoons of the bacon grease.
Peel and chop the hard-boiled eggs.
Put the potatoes in a large pot, cover with water, then bring to a boil and boil 10 minutes over high heat. While potatoes are boiling, combine bacon bits, chopped eggs, and chopped onion in a large mixing bowl. Measure out the other ingredients and have them ready.
When potatoes are boiled, drain, then dump in the mixing bowl on top of the bacon bits, eggs, and onion. Quickly throw in the other ingredients and mix everything well while the potatoes are still hot. It should be a little sloppy. Taste and adjust the seasonings (I always add a bit more vinegar and salt).
* * * * *
This is good hot, but better at room temperature. Let it cool completely, and cover closely with plastic wrap if refrigerating. It also improves with sitting for a couple hours, as the flavors have time to blend a bit.
My mother makes truly amazing potato salad. She learned to make potato salad right after she and my dad were married, and her recipe came from one of her neighbors, a little old German lady. It's sinful: lots of cholesterol, salt, carbohydrates, not even close to kosher, and guaranteed to pique the most jaded appetite. She taught me how to make it, and I make it for Easter, even though there are only two of us--that just means there's more for us!
Audrey's Amazing Smashed Potato Salad
- 1 dozen eggs, hard-boiled (I do these the day before)
- 1 pound bacon, diced
- 1 big onion, finely chopped
- 5 pounds russet potatoes, peeled and cubed
- 1/2 cup white vinegar
- 1 1/2 cups mayonnaise
- 2 tablespoons sugar
- 1 1/2 teaspoons salt
- 1 teaspoon white pepper
- 2 tablespoons bacon grease
Fry the bacon until crisp. Set fried bacon bits aside on paper towels to drain, and reserve at least 2 tablespoons of the bacon grease.
Peel and chop the hard-boiled eggs.
Put the potatoes in a large pot, cover with water, then bring to a boil and boil 10 minutes over high heat. While potatoes are boiling, combine bacon bits, chopped eggs, and chopped onion in a large mixing bowl. Measure out the other ingredients and have them ready.
When potatoes are boiled, drain, then dump in the mixing bowl on top of the bacon bits, eggs, and onion. Quickly throw in the other ingredients and mix everything well while the potatoes are still hot. It should be a little sloppy. Taste and adjust the seasonings (I always add a bit more vinegar and salt).
* * * * *
This is good hot, but better at room temperature. Let it cool completely, and cover closely with plastic wrap if refrigerating. It also improves with sitting for a couple hours, as the flavors have time to blend a bit.
Friday, March 13, 2015
Casting About
 The sweater is officially under way! I finished the calculations to scale up the sweater last night, and cast on the back. I couldn't have done it without the help of The Complete Book of Progressive Knitting by Ida Riley Duncan. Originally published in the early 1940s, it's a little treasure-trove of information on how to knit garments that fit. I used it before when I knit the Skull Sweater, and it has come in handy now. Scaling it up meant adding four additional repeats to the back; to accommodate my waist, I also increased the number of stitches at the bottom edge and decreased the number of increases in Row 46.
Right now, I'm slowly working my way through 45 rows of "1x1" (knit 1, purl 1) ribbing...on #2 needles. No pictures for now--ribbing isn't interesting. I'll post a picture when I'm deep into the cables.
Wednesday, March 11, 2015
Acting Snoody
 |
| Long hair: it never goes out of style. |
I'm doing more 20th century historical reenacting, so dealing with my mane has become a bit...problematic. Early 20th century ("Edwardian" and World War I) isn't too much of a problem, as women still had long hair, and the hairstyles require lots of hair. This all changed in the 1920s though--women started cutting their hair, and suddenly short hair was all the rage. Now I look fabulous with short hair...with the right cut. Decades ago, I found a guy who could cut my hair: he had worked for the legendary Sydney Guilaroff, and he knew how to cut it into a short, 1920s-style bob that suited both my hair and my face. Sadly, he's now gone, and I've had enough bad haircuts to make me stick stubbornly to my long locks.
 |
| Triple Thread Snood (1942) |
Snoods have gone in and out of fashion since the Middle Ages. The last time they were popular was in the 1860s, and they made a resurgence in the early 1940s when women needed a way to keep their hair out of the way that didn't make them look like frumps. Everybody wore snoods: milliners like Lilly Dache sold them, and yarn companies published patterns for those who could crochet.
I found a great pattern for a crocheted snood in a little book entitled, Make Do and Mend for Victory. Published by The Spool Cotton Company (maker of Coats & Clark threads and yarns) in 1942, it's chock-full of tips and instructions on how to keep one's wardrobe up-to-date and in good repair. The original pattern called for crocheting with three strands of #10 cotton; I have a bunch of vintage 10/4 mercerized cotton that I've dyed in a rainbow of colors, so I opted for 2 strands throughout, and used a couple ounces of the brightest red, to match the rick-rack on a blouse. I also skipped the ruffle at the top: I plan on wearing a hat.
 |
| My new snood, from the back. |
I think I'll wear an invisible hairnet under it to keep my hair from working through the mesh, but it has the right shape and weight. Hair problem solved!
Monday, March 02, 2015
Purling Harder
 |
| A 1942 WPA poster encouraging America's women to knit. |
As I start to go to historical events again, I need to take my knitting with me to keep me occupied (and happy). My rules for "historical" knitting:
- It must be historically accurate.
- It must be useful in some way.
The first is pretty obvious--if it's not accurate, I can't have it out, so it will be accurate. Fortunately, I have a lot of historically accurate yarns, needles, and patterns for everything from 17th century socks to WWII sweaters and gloves. I've got this covered.
The second is a bit more challenging. Right now I have a WWII sweater for myself in the works, but I like to do that kind of knitting on modern (circular) needles. Same with socks--I'm a confirmed "toes up, one-at-a-time, 2 circular needles" sock knitter. I've knit socks on double-pointed needles (DPNs), and I've knit socks from the top down, so the knowledge and skills are there. I simply don't like to knit socks that way. I also don't like plain socks, especially in navy, khaki, or olive green. Socks are definitely out for reenacting knitting.
That leaves sweaters, of which everyone seems to have plenty, gloves, and mufflers. Sweaters and gloves are a bit silly in the land of eternal sunny weather--after all, what good are heavy sweaters when it rarely gets below 60 degrees? Mufflers (aka scarves), on the other hand, have some possibilities. The National World War II Museum in New Orleans began a scarf drive back in 2007, with the goal of making scarves for WWII veterans. The drive was so successful that the program has continued, and has now distributed more than 30,000 scarves to veterans through the VA centers scattered throughout the United States.
Mufflers are flat, so they can be knitted on "straights" (single-ended needles), pretty mindless, use up a lot of the worsted-weight yarn I have in the stash, and will end up keeping some veteran's neck warm.
I found a nice muffler pattern distributed by the American Red Cross in 1940 that is incredibly simple: 2 inches of 2x2 ribbing, then 68 inches of stockinette before finishing with 2 more inches of 2x2 ribbing. I'm going to alter the pattern slightly to fit today's scarf requirements--after all, there isn't that much demand for a scarf that is 11 inches wide and 72 inches long--and see how many mufflers I can knit "for the boys" (and girls) before shipping them off to the museum at the end of the year.
Thursday, February 26, 2015
Snap-On Yarns!?!
 |
| The Snap-On Tool Guy, bringing tools to happy mechanics. |
 |
| The Yarnover Truck, bringing yarns to happy knitters. |
At Stitches this year, I picked up one of their flyers: the Yarnover Truck is making a road-trip to Central and Northern California. From April 25 to May 17, the truck is making a dozen stops along the Central Coast and in the Bay Area. Admittedly, it's not quite as convenient as having the yarn truck roll right up to the studio, but perhaps some enterprising young weaver might decide to outfit a step van with tools and yarns and start making a circuit of Northern California.
Monday, February 23, 2015
Which Needles With What Yarn?
 |
| My tiny pattern swatch. |
I did some work on redacting the pattern last August, but didn't get very far because I didn't have the yarn on hand for swatching. I gave the yarn some serious thought: I wanted something soft, relatively sturdy, and not too expensive, as I need a lot of yarn (about 22 ounces). DROPS Baby Merino wasn't available in colors I liked, and Cascade Heritage 150 just didn't "feel right." I finally settled on an old friend--KnitPicks Stroll sock yarn--in the "Indigo" colorway--a soft, dusky blue that looks a bit like worn denim, and a lot like the old sweaters from the 1940s that I remember from childhood.
Once I got the yarn, swatching was in order. I started with the needles recommended by Cyberseams.com's needle conversion chart, and the gauge was off--either I now knit loose (not likely after a lifetime of knitting tight), or the chart is wrong.
Time to break out my prized Walker bell gauge. I have a beautiful, brass, bell gauge from just after World War I that is wonderful for redacting old British knitting and crochet patterns. According to the Bell gauge, a "number 8 pin" is the same size as a modern US#5/3.75mm needle, while a "number 12 pin" is the same size as a modern US#1/2.25mm needle.
 |
| A close-up of the swatch. The cables are pretty cool. |
So, now I have my yarn and my gauge, and I'm going to order a couple Addi Rocket circular needles in #1 and #5 for my knitting. Why Addi Rockets? I like the super-slick nickel-plated finish and the lace points. I got a set last year for sock-knitting, and love them, so knitting this sweater, with all its cables, will be a lot more fun on really nice needles.
OTN: I'm on the last square of the stash-buster afghan. Once it's knitted up, I have a lot of crocheting to put all the squares together, but the first quarter of the afghan is assembled.

Sunday, February 15, 2015
A Not-So-Tiny Project
 |
| Some of my personal pattern stash. |
I will admit this freely: I have a large pattern stash. I like patterns. Yes, I know how to create my own pattern from a drape, but it's a lot easier, working by myself, to use a pattern and alter it. I frequently check the major pattern companies' websites, and when the local fabric store has a good sale (usually a couple times a month), I run down there with a list and buy the patterns I've been stalking. I also have never willingly thrown a pattern away. As a result, I have several hundred patterns, from simple skirt and top patterns I bought when in high school, to very decent historical/vintage patterns issued by Simplicity, McCalls, Butterick, Vogue, Truly Victorian, Past Patterns, and so on.
The first step: how am I going to organize them? My patterns have been organized by pattern company for the past 20 years, and I'm finding that isn't working, as it's not how my mind works. I've sewn nothing but historical costumes for so long that I tend to think in terms of approximate date: big shoulders in the '40s, trapeze back jackets and pencil skirts in the '50s. The patterns would be more useful if organized by decade.
The second step is creating some sort of list. I set up an Excel spreadsheet for nothing more than the most basic information: pattern company; pattern number; a brief description (including publication date); size; and any comments, such as a specific line of patterns. I created a separate "page" for each pattern company, and started putting in the information.
Pulling out each box of patterns and going through them has been a walk down memory lane. I have the pattern my mother used to make her dress for my wedding in 1978. In another box was the pattern for a friend's wedding dress that I made in 1980. Remember the sensation caused by Yves Saint Laurent's "Russian" collection in 1976? I have a Vogue pattern for the vests featured in that collection. Skirts, blouses, dresses, knickers--pick a fashion trend from the 1970s through 1990s, and I probably have a pattern for it. And the fabric stores! Once upon a time, fabric stores stamped the pattern envelope with the name of the store and "Not Returnable." My pattern collection is a "Who's Who" of Southern California stores, and I can date when I purchased the patterns from the names stamped on them: TG&Y and Home Silk Shops from the 1970s; Michael Levine's, Cloth World, and Princess Fabrics in the 1980s; New York Fabrics, JoAnn's, and Hancock Fabrics (where I still shop) in the 1990s.
The third step is to file them in boxes. This is easier said than done. For years, Hancock Fabrics sold nice corrugated cardboard boxes for storing patterns. They're just the right size for the shelves in the laundry room, and I have a dozen. Unfortunately, Hancock's stopped selling them about a year ago, and the only alternative are Dritz pattern storage boxes, which are four times as expensive. IKEA to the rescue! It turns out that regular (6x8½ inch) pattern envelopes fit perfectly in the larger Kassett boxes made for storing DVDs, and they're nearly the same price as the corrugated pattern boxes.
 |
| Organized, inventoried, and safely put away. |
Friday, February 06, 2015
The Best-Laid Plans...
...often go awry, or so said Robert Burns. I was hoping to report that the loom was warped, and that my swing-back topper was nearly finished, but instead I spent most of the last week lounging on the chaise, blowing my nose, wiping my eyes, watching old movies, and knitting. I had a ferocious, streaming, head cold.
The upside (if there is one) of this enforced idleness: I got to see a lot of really great movies. Turner Classic Movies (aka "TCM") is in the middle of their "31 Days of Oscar," so everything they are running has received at least one Academy Award nomination, and most films have multiple awards. I tend toward the older flicks, and I've had a thorough wallow: The Broadway Melody (1929), 42nd Street (1933), Suzy (1936), Wings (1927), Tale of Two Cities (1935), and many more.
Another upside: I finished knitting a lace scarf. As it is intended as a gift later this month, it's nice to know I finished it in plenty of time. I'll post a picture, but not yet--I don't want the intended recipient to see it early.
At any rate, the cold is now behind me, and it's time to get back to work. To keep you amused, a publicity shot of Hollywood's greatest costume designer, with "her boys."
The upside (if there is one) of this enforced idleness: I got to see a lot of really great movies. Turner Classic Movies (aka "TCM") is in the middle of their "31 Days of Oscar," so everything they are running has received at least one Academy Award nomination, and most films have multiple awards. I tend toward the older flicks, and I've had a thorough wallow: The Broadway Melody (1929), 42nd Street (1933), Suzy (1936), Wings (1927), Tale of Two Cities (1935), and many more.
Another upside: I finished knitting a lace scarf. As it is intended as a gift later this month, it's nice to know I finished it in plenty of time. I'll post a picture, but not yet--I don't want the intended recipient to see it early.
At any rate, the cold is now behind me, and it's time to get back to work. To keep you amused, a publicity shot of Hollywood's greatest costume designer, with "her boys."
 |
| Costume designer Edith Head and her 8 Academy Awards. |
Thursday, January 29, 2015
Ravelry for Sewing
I am spoiled. I've been a member of Ravelry since 2008, and it's become an important tool in my life as a fiber and textile artist: my very large stash of fibers and yarns are inventoried, I have a library full of patterns (and more in Ravelry's extensive library of 500,000+ patterns), and I keep track of spinning, weaving, knitting, and crochet projects in my project pages. As I've said many times, it's as if Casey and Jess Forbes, the creators of Ravelry, crawled around inside my head and created an online solution to all my fiber arts organization problems.
Unfortunately, fiber arts are only a portion of my creative life. I sew, everything from stuff for the house to historical and fantasy costumes. I have a huge fabric stash (my yarn stash only recently surpassed my fabric stash). I have several hundred patterns (including multiple copies of some that I forgot I purchased). I need some way to keep track of everything I get for a sewing project, what patterns I have, what fabrics and notions I have, and what changes I make to a pattern in the process of sewing something. I need a Ravelry for my sewing!
I know I'm not the only sempstress with this dilemma, so I started searching online for solutions. My criteria:
Unfortunately, fiber arts are only a portion of my creative life. I sew, everything from stuff for the house to historical and fantasy costumes. I have a huge fabric stash (my yarn stash only recently surpassed my fabric stash). I have several hundred patterns (including multiple copies of some that I forgot I purchased). I need some way to keep track of everything I get for a sewing project, what patterns I have, what fabrics and notions I have, and what changes I make to a pattern in the process of sewing something. I need a Ravelry for my sewing!
I know I'm not the only sempstress with this dilemma, so I started searching online for solutions. My criteria:
- be as simple and intuitive to use as Ravelry
- be able to store inventories of fabrics, notions, and patterns
- be able to create individual project pages that, preferably, link to the fabrics, notions, and patterns
- Kollabura. Too diverse: more of a Do-It-Yourself, everything-to-everybody site rather than being specific to sempsters/sempstresses.
- Threadbias. Too basic. Does not have a basic pattern library feature.
- PatternReview. Primarily a review and chat site. Charges $30/year for access to pattern "stash" feature, but paid membership also gets a 10% discount at Jo-Ann's and other sewing-related businesses.
- Seamed Up. Shut down in 2012, due to lack of interest.
- Sew Mama Sew. Lacks ability to store member information.
- My Sewing Circle. Closest to Ravelry in look and feel (not surprising, as one of the creators is a Raveler). Fairly simple to use. Has ability to store inventories of fabrics, notions, and patterns. Has individual project pages, with ability to link stashed fabrics, patterns, and notions.
I've been playing around a bit with My Sewing Circle (I'm dtjacobson on it), and it's...OK. Not great, just OK. My Sewing Circle has been around since 2010, but has only 16,000 members. By comparison, Ravelry had over 2 million members at its fifth anniversary. Member numbers are important: it takes a certain number of members to maintain an active online community, and 16,000 is barely enough.
There are also a couple of potentially serious problems with the site itself. The single biggest one is the inability to search a forum thread (online community-speak for an online discussion) for specific information. This means that one either has to read every single post to a topic (and there can be hundreds of posts) to find that bit of information, or simply ask someone to repost it or directions to the original bit of information.
The other potentially serious problem is the way fabrics are organized. They aren't. There isn't any way to add a thumbnail image of the fabric in an individual stash without creating a new "fabric" entry for the entire site. As a result, instead of a single fabric entry for a fabric with 18 patterns and colorways, there are 18 fabric entries (one for each design and/or colorway).
My Sewing Circle has recently changed hands. I sent a message to the new owners regarding continuing support for the site and, I must admit, I'm a bit hesitant to recommend it. The new owners have not been members very long (less than 4 months), and don't seem to be using the site very much. In fact, nobody seems to be using the site very much, other than to catalog sewing projects. If the site is given the support and "push" it needs to begin growing, it may, eventually, turn into every fabric lover's dream: a Ravelry for the sewing and costuming community.
Saturday, January 24, 2015
Shut Up and Sew!
I'm currently multi-tasking: eating my breakfast (OK, lunch--I missed breakfast), writing a blog post, and waiting for the iron to get hot again so I can go back to my current project. I should be finished with this skirt, but Thursday went very sideways--the local (Vallejo) Hancock Fabrics was temporarily closed (plumbing problems--there was 2 inches of water on the floor), I found what I wanted to get at the Napa Hancock's, but discovered that the coupons I clutched in my fist weren't good until yesterday.
After spending the morning moving furniture in and out of the house, I went back to Hancock's yesterday, and made the trip worth my while: 8 patterns, 3 pieces of fabric, 2 zippers, and some trim for a throw/slipcover for the new chaise. As soon as I got home, the denim went into the washing machine for pre-washing, and I started trimming the pattern pieces to make a skirt.
This is one of McCall's "Quick and Easy" patterns. Easy? Definitely, especially if one knows how to sew. Quick? Maybe, if one is exactly the size the pattern is graded for. I'm not, so I had to spend some time making alterations to the yoke/waistband, then to the pieces themselves. It's also "quick" if doing what I call "slash and burn" sewing--throw it together as fast as possible. This is clothing, not costuming, so I want something that is going to be well-made and hard-wearing, so I take my time: tailor's tacks where necessary, lots of pressing, and a willingness to do handsewing as it is needed, rather than taking shortcuts. The result? I worked about 6 hours on the skirt last night, and have a couple hours of sewing (attaching the yoke facing, putting in the zipper, and hand hemming) to have a skirt that's ready to wear tomorrow.
After spending the morning moving furniture in and out of the house, I went back to Hancock's yesterday, and made the trip worth my while: 8 patterns, 3 pieces of fabric, 2 zippers, and some trim for a throw/slipcover for the new chaise. As soon as I got home, the denim went into the washing machine for pre-washing, and I started trimming the pattern pieces to make a skirt.
This is one of McCall's "Quick and Easy" patterns. Easy? Definitely, especially if one knows how to sew. Quick? Maybe, if one is exactly the size the pattern is graded for. I'm not, so I had to spend some time making alterations to the yoke/waistband, then to the pieces themselves. It's also "quick" if doing what I call "slash and burn" sewing--throw it together as fast as possible. This is clothing, not costuming, so I want something that is going to be well-made and hard-wearing, so I take my time: tailor's tacks where necessary, lots of pressing, and a willingness to do handsewing as it is needed, rather than taking shortcuts. The result? I worked about 6 hours on the skirt last night, and have a couple hours of sewing (attaching the yoke facing, putting in the zipper, and hand hemming) to have a skirt that's ready to wear tomorrow.
 |
| The front of my new denim skirt, with the yoke facing pin-basted in place. |
Thursday, January 22, 2015
I Need Clothes!
 |
| Knickers, boots,vintage mink, and the arrogance of youth, circa 1977. |
Somewhere in the early 1990s, I misplaced my fashion sense and my clotheshorse tendencies. Some of it might have been the move to northern California (the Bay Area really is less appearance-conscious than Los Angeles) and some of it might have been the jobs I worked at (the last ten years of teaching I wore jeans or khakis to work every single day). No matter: the result was a closet full of thin V-necked sweaters appropriate for the classroom, and drawers full of T-shirts and jeans. The few items I still have from my days of working in offices are wool suits--nice, but Boring.
I've been out of the classroom for two years, launched on my current career as An Artist, and I've discovered that I have Nothing To Wear. Part of being an artist is being seen in public: there is a monthly local ArtWalk, weekly get-togethers at the local coffee roaster, and a host of other events throughout the year that require a bit more than jeans and T-shirts. I tried to fill in the gaps in my wardrobe with some basic pieces, only to discover that: a) there is little that fits my personal style; and (more importantly) b) most of what is available as ready-to-wear is poorly made crap. Example: I bought a long black rayon skirt to wear in the evenings. I wore it only 3 or 4 times before I found a hole in the fabric (not at a seam), simply there because the fabric wasn't very good quality. That skirt cost me nearly $10/wearing--not a good investment.
 Fortunately, there's a solution: I sew. In fact, I sew pretty darned well. I can go back to making my own clothes. I stopped sewing because teaching took up all my time, but I now have a bit more time, and I can indulge myself with high-quality handmade clothing. I was already leaning in this direction--I recently picked up a length of beautiful Italian wool tweed to make a Chanel jacket, and that started me down the rabbit hole of couture sewing--so it didn't take much to decide I'll simply start making nearly all my own clothes again.
First up on the list is a new skirt to wear when I want something casual, but not jeans. Hancock Fabrics has McCall's patterns on sale this week, and I think this skirt pattern, executed in lightweight denim, will fill the bill nicely. Now, if I could just find that hubris...
Wednesday, January 21, 2015
Back to Work
New Year'sResolutions Goals for 2015:
New Year's
- Exercise more/eat less (Doesn't everybody put this on their list?)
- Weave one warp for myself.
- Weave at least one warp with 8 or more shafts.
- Become production-proficient at both Rosepath and Summer & Winter (types of weave structures)
- Get warps on and off the looms in a more efficient manner.
- Survive the next round of work on the house.
- Master couture sewing and make myself some new clothes I love.
- Blog more often.
Currently reading: Couture Sewing Techniques by Claire Shaeffer.
Subscribe to:
Posts (Atom)
